Diymore แบตเตอรี่ลิเธียมลิเธียม 12V 100A~200A Diy สําหรับควบคุมเชื่อม
ข้อมูลสินค้า
ราคา
695.00 320.00 บาท
ขายแล้ว
32 ชิ้น
แบรนด์
DIY More(ดีไอวาย มอร์)
ร้านค้า
จุดขายผลิตภัณฑ์:
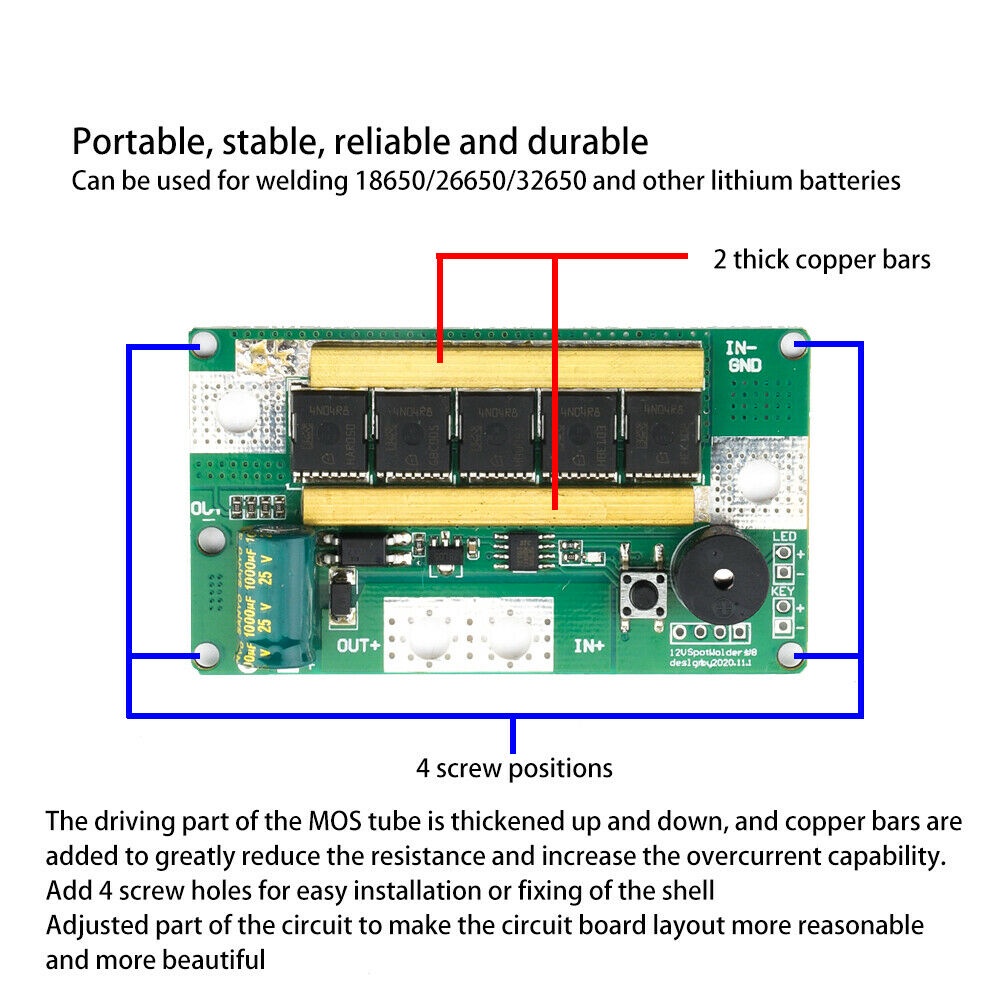
1. แบบพกพา มั่นคง เชื่อถือได้ และทนทาน. ใช้สำหรับเชื่อม 18650/26650/32650 และแบตเตอรี่ลิเธียมอื่นๆ
2. ส่วนขับท่อ MOS หนาขึ้นและลง และมีการเพิ่มแถบทองแดงเพื่อลดความต้านทานอย่างมาก และเพิ่มความสามารถกระแสเกิน
3. เพิ่มรูสกรู 4 รูเพื่อให้ติดตั้งหรือยึดเปลือกได้ง่าย
4. มีการปรับวงจรบางส่วนเพื่อให้เลย์เอาต์ของแผงวงจรมีความสมเหตุสมผลและสวยงามมากขึ้น
5. มีการปรับวงจรบางวงจรเพื่อให้เลย์เอาต์ของแผงวงจรมีความสมเหตุสมผลและสวยงามมากขึ้น
พารามิเตอร์หลัก:
ข้อกำหนดด้านพลังงาน: การเชื่อมเฉพาะจุดใช้หลักการให้ความร้อนและความเย็นในพื้นที่อย่างรวดเร็วด้วยกระแสไฟสูงและต้องใช้กระแสไฟที่เพียงพอ โดยทั่วไปกระแสเชื่อมแผ่นชุบนิกเกิล 0.1-0.15 อยู่ที่ประมาณ 90-150A ดังนั้นแหล่งจ่ายไฟในการทำงานของแผงวงจรต้องมากกว่าหรือเท่ากับ 150A
แรงดันไฟฟ้าของแหล่งจ่ายไฟ: 12V-15V
ปัจจุบันทำงาน: 100-200A
หมายเหตุ: มันจะไม่ทำงานหากปล่อยต่ำกว่า 100A
แบตเตอรี่ที่มีกระแสไฟไหลออกมากจะส่งผลโดยตรงต่อผลการเชื่อม
คำแนะนำสำหรับการใช้งาน:
การเชื่อมเป็นสาขาวิชาวิศวกรรม การเชื่อมแบบจุดได้รับผลกระทบจากปัจจัยต่างๆ เช่น เวลาพัลส์ มุมเชื่อม ความแข็งแรง และความเรียบของพื้นผิวการเชื่อม และผลจะแตกต่างกันไป
เมื่อทำการเชื่อมเฉพาะจุด ให้วางปากกาบัดกรีบนแผ่นนิกเกิลเบาๆ อย่าใช้แรงกดปากกาบัดกรี ระยะห่างระหว่างหมุดบัดกรีทั้งสองนั้นใกล้กว่าเล็กน้อย หากข้อต่อบัดกรีกลายเป็นสีดำ ให้ลดเกียร์ลง และหากบ่อหลอมเหลวมีขนาดเล็กเกินไป ให้เพิ่มเกียร์
ใช้ใบมีด ชามสแตนเลส และเหล็กและสแตนเลสอื่นๆ ที่มีพื้นผิวขนาดใหญ่กว่าก่อนทำการเชื่อม จากนั้นจึงเชื่อมแบตเตอรี่หลังจากทำความคุ้นเคยกับการใช้งานแล้ว
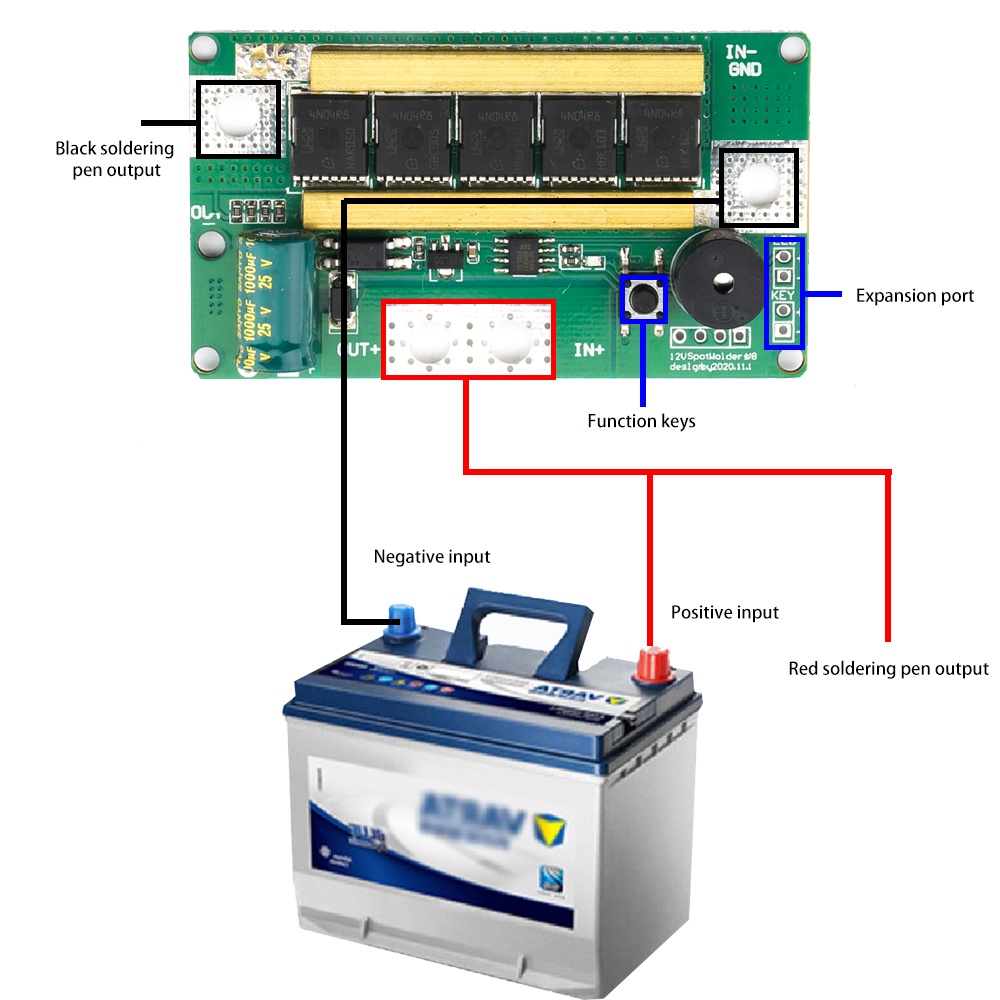
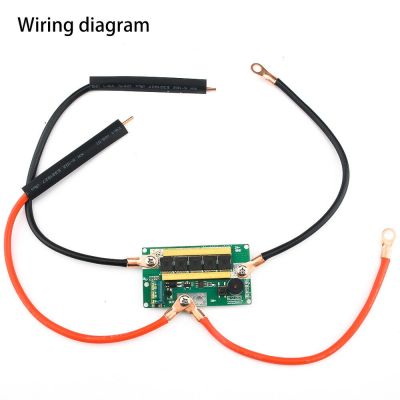
คำจำกัดความของอินเทอร์เฟซ: โปรดปฏิบัติตามคำแนะนำในการเดินสายอย่างเคร่งครัด การเชื่อมต่อที่ไม่ถูกต้องอาจทำให้แผงวงจรไหม้ได้
ปุ่มฟังก์ชั่น: ใช้สลับเครื่องและเปลี่ยนเกียร์
กดปุ่มฟังก์ชั่นค้างไว้เพื่อบู๊ตและเริ่มต้นเกียร์แรกให้กดปุ่มฟังก์ชั่นค้างไว้ 2 วินาทีเพื่อปล่อยเกียร์จะเพิ่มขึ้นทีละเกียร์และเสียงกริ่งจะดังขึ้นตามจำนวนครั้งที่ LED กะพริบตาม เกียร์.
ตัวอย่าง: ในเกียร์ 3 เสียงกริ่งจะดังขึ้น 3 ครั้งและไฟ LED จะกะพริบ 3 ครั้ง
มีทั้งหมด 5 เกียร์ ตั้งแต่เกียร์ 1 ถึงเกียร์ 5 ความแข็งแรงของการเชื่อมแบบจุดจะค่อยๆ แข็งแกร่งขึ้น และเกียร์ 5 จะแข็งแกร่งที่สุด หลังจากเกียร์ 5 ให้กดปุ่มฟังก์ชั่นค้างไว้เพื่อปิดเครื่อง
หมายเหตุ: ผู้ใช้จำเป็นต้องติดตั้งออด หากไม่ได้ติดตั้งไว้จะไม่ส่งผลต่อการเชื่อม
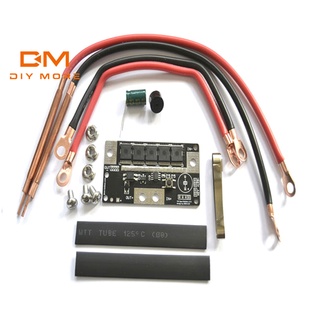
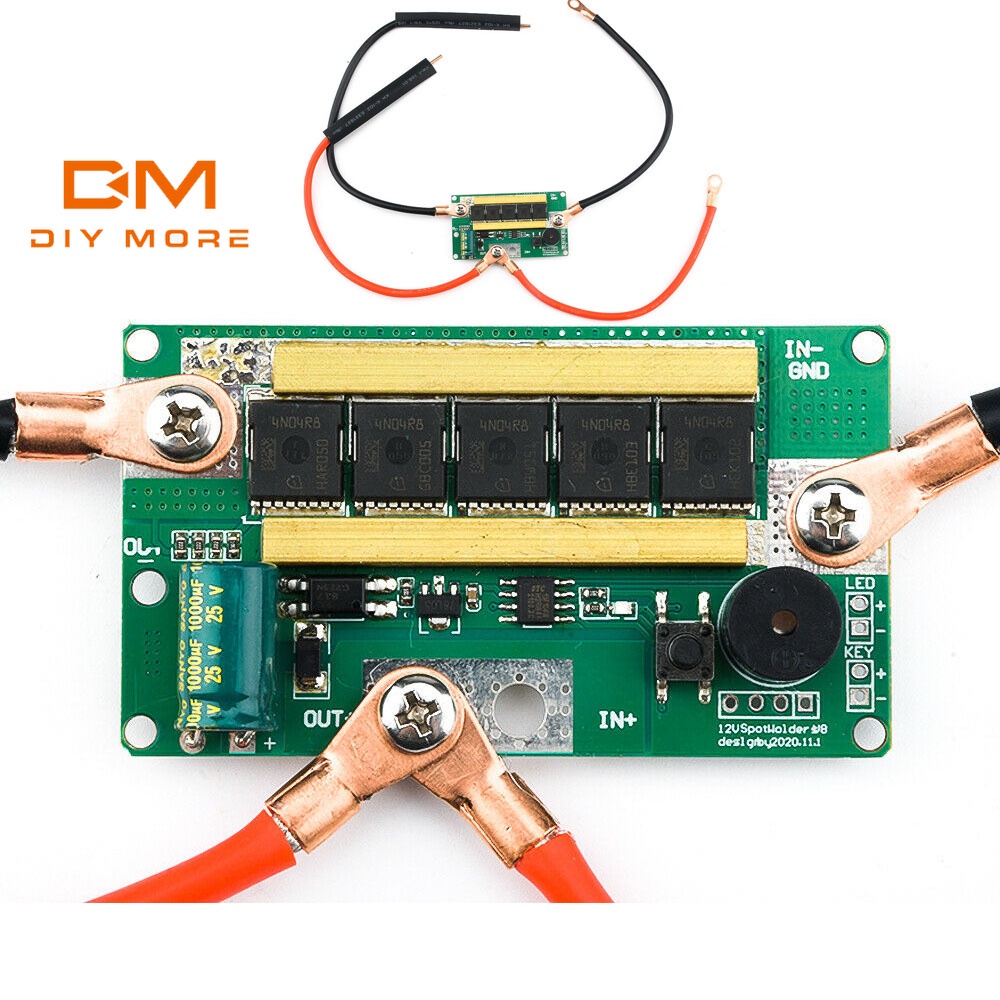
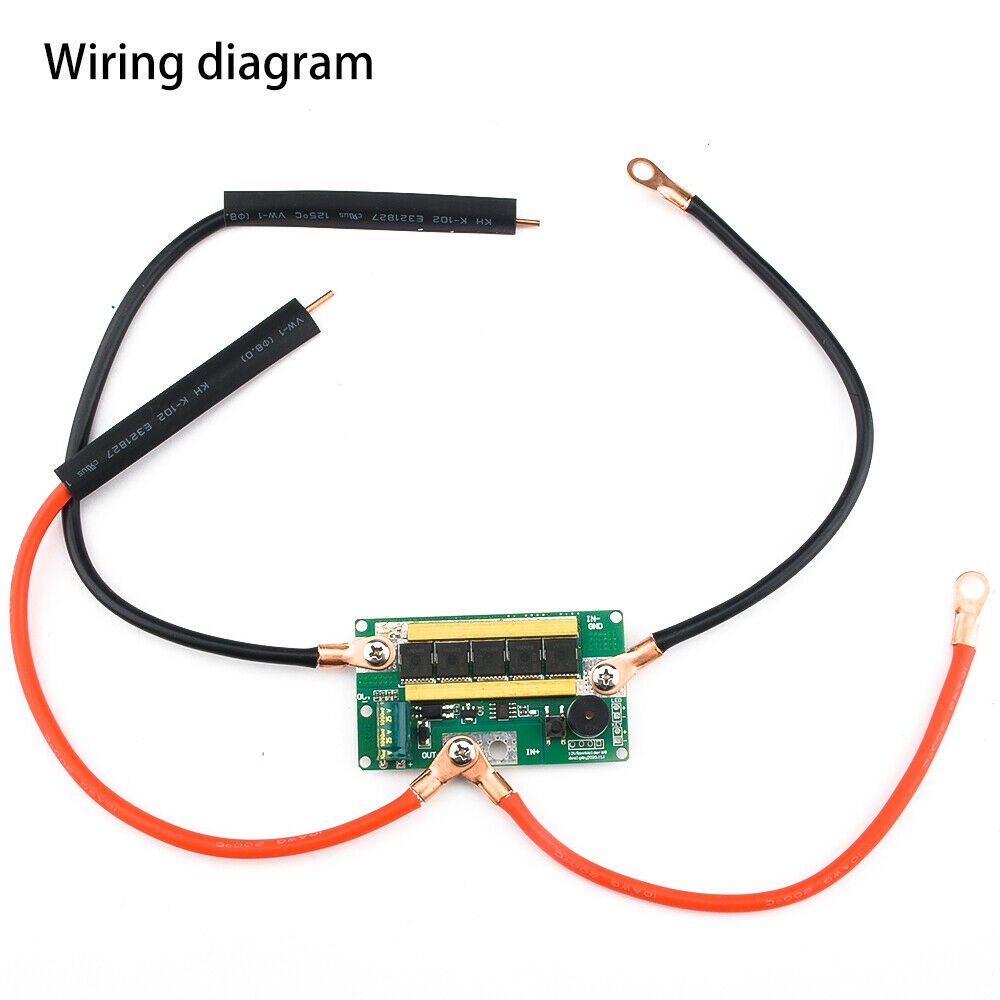
รายการ:
ปากกาบัดกรี*2
สายอินพุต*2
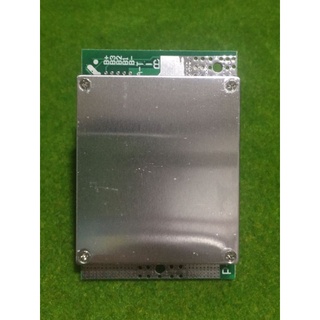
แผงวงจร *1
ชุดสกรู*4
ท่อหดความร้อน*2
แผ่นนิกเกิล*1
Product selling points:
1. Portable, stable, reliable and durable. Can be used for welding 18650/26650/32650 and other lithium batteries
2. The MOS tube driving part is thickened up and down, and copper bars are added to greatly reduce the resistance and increase the overcurrent capability
3. Add 4 screw holes for easy installation or fixation of the shell
4. Some circuits have been adjusted to make the layout of the circuit board more reasonable and beautiful
5. Some circuits have been adjusted to make the circuit board layout more reasonable and beautiful
The main parameters:
Power requirements: Spot welding uses the principle of rapid local heating and cooling with high current, and requires sufficient current supply. Generally, the current of 0.1-0.15 nickel-plated sheet welding is about 90-150A, so the working power supply of the circuit board must be greater than or equal to 150A.
Power supply voltage: 12V-15V
Working current: 100-200A
Note: It will not work if it is discharged below 100A.
A battery with a large discharge current will directly affect the welding effect.
Instructions for use:
Welding is an engineering discipline. Spot welding is affected by factors such as pulse time, welding angle, strength, and flatness of the welding surface, and the effect will vary.
When spot welding, just place the soldering pen on the nickel sheet lightly. Do not use force to press the soldering pen. The distance between the two soldering pins is a little closer. If the solder joint becomes black, lower the gear, and if the molten pool is too small, increase the gear.
Use blades, stainless steel bowls and other iron and stainless steel with larger surfaces before welding, and then weld the battery after familiarizing yourself with the operation.
Interface definition: Please strictly follow the instructions for wiring, wrong connection can cause the circuit board to burn out
Function keys: used to switch the machine and switch gears
Long press the function button to boot, and default to the first gear, press and hold the function button for 2 seconds to release, the gear will increase by one gear, and the buzzer will sound the number of times the LED flashes corresponding to the gear.
Example: In gear 3, the buzzer sounds 3 times and the LED flashes 3 times.
There are 5 gears in total, from the 1st gear to the 5th gear, the spot welding strength is gradually strengthened, and the 5th gear is the strongest. After the 5th gear, press and hold the function key to shut down.
Note: The buzzer needs to be installed by the user. If it is not installed, it will not affect the welding.
List:
Soldering pen*2
Input wire*2
Circuit board *1
Screw set*4
Heat shrinkable tube*2
Nickel sheet*1


![[BestBuyshop] รีเลย์สตาร์ทรถยนต์ 200A 100A 12V 24V](https://down-th.img.susercontent.com/file/sg-11134201-7qvdm-lk6j8ih1u0ouf2_tn)
![[fashionmango] รีเลย์สตาร์ทรถยนต์ 200A 100A 12V 24V](https://down-th.img.susercontent.com/file/ce4022730da48a83dc980f4b163722d6_tn)
![รีเลย์สวิตช์รถยนต์ รถบรรทุก 24V 12V 200A 100A [countless.th]](https://down-th.img.susercontent.com/file/sg-11134201-7rbk0-lkm57pk370e148_tn)

![[ElectronicMall01.th] รีเลย์สตาร์ทรถยนต์ 200A 100A DC 12V 24V 4Pin](https://down-th.img.susercontent.com/file/sg-11134201-7qvd1-lk7z3ecd95yj7f_tn)